Python Caching – What is MemCached & How to use MemCached
What is Python Django Caching
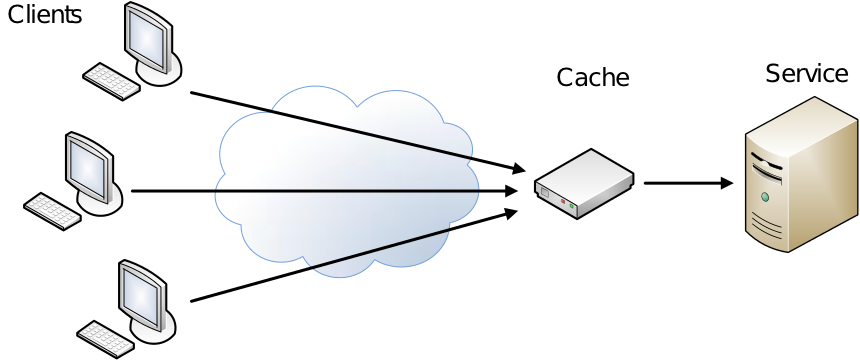
In this article we will use caching because it is simpler and more convenient. Caching is the process of storing it in a specific place for later use. Dynamic sites display data to the user , while the database connection, queries, calculations, such as many things are passed. If the traffic of the site is not too high, the server may not be able to perform these operations at any time. However, in cases where site traffic is very high, these processes can cause the server to become too slow to respond. Time here instead of doing each of these processes once they’ve done it over and over again by storing this data stored, we call the use of caching.
Django comes by supporting the caching thing. 3 types are file system, database, and memory.
File System
After the pages are created, it is the case that the same page should be called from this file if it is requested again by saving it to the file system with a switching password. Project for this use settings.py we add the following codes to the file.
1 2 3 4 5 6 | CACHES = { 'default':{ 'BACKEND' : 'django.core.cache.backends.filebased.FileBasedCache', 'LOCATION' : '/home/opensourceprojects/caching/' } } |
Here we enter the caching method and the parameters we will use with the caches variable. We specify which caching method to use with the backend switch in the dictionary. With the location outline, we specify the path to the file. If you use Windows, you might have something like this.
1 | 'LOCATION' : 'C:/caching' |
Or we can specify the project directory we used frequently. We can use it like this.
1 2 3 4 5 6 | CACHES = { 'default':{ 'BACKEND' : 'django.core.cache.backends.filebased.FileBasedCache', 'LOCATION' : os.path.join(ustDizin,'caching') } } |
Now we’ve got it adjusted. We can use the Django Shell to control it. You can type the following codes by opening the Django shell.
1 2 3 4 | >>>from django.core.cache import cache >>>cache.set('anahtar','Ilk Caching',30) >>>cache.get('anahtar') Ilk Caching |
The first parameter is the key to the data to be stored, and then the value. The number and the part we specify indicate how long this key will be stored. Entering value in seconds. Cache again after you have passed 30 seconds.if you type Get(‘key’), you will find that no results are returned. You can see that files are created in the path that you specify in the file system. Likewise, the files will be deleted after the time you specify.
Database
settings.py the same process we did in his file. We just mentioned a file path. For example, if you want to create a new table, you can create a new table. To do this, we give the following command from the command line.
1 | python manage.py createcachetable caching_table |
We created the table where the data will be stored. settings.py we’re typing the following codes into his file.
1 2 3 4 5 6 | CACHES = { 'default':{ 'BACKEND' : 'django.core.cache.backends.db.DatabaseCache', 'LOCATION' : 'caching_table', } } |
We have specified that we will caching the database with the backend switch. We just created the table on the location key. You can use the same method we just did.
Memory
The fastest caching method. All of the stored information is stored. So when the system is shut down, all of them are erased. The larger the memory size, the better the caching is done.
Local Memory
Local memory caching is performed on the machine where Django is running. For this cacheing settings.py here’s what we need to write down in his file.
1 2 3 4 5 | CACHES = { 'default':{ 'BACKEND' : 'django.core.cache.backends.locmem.LocMemCache', } } |
Distributed Memory

How To Install Memcached
Memory caching is most performed with the memcached Server. With this server, multiple clients can connect to a machine or multiple caching servers can be set up in the project. The local machine makes another machine with the caching process when it meets Web requests.
memcached should be set up first. To do this, you can give the following commands in Linux:
1 2 | $ sudo apt-get install memcached $ sudo apt-get install python-memcache |
Windows users from here after downloading the following command from the command line as an administrator by coming to the directory they remove.
1 | memcached.exe -d install |
How to use Memcached
Then open the Windows Control Panel as administrator and open system and Security->Administrative Tools->Services. find memcached and double-click it. That’s how you start the service. When you restart the computer, the Startup type for the automatic startup must be automatic. If everything is correct, you will get the following output when you type netstat-ab from the command line.
1 2 | UDP 0.0.0.0:11211 *:* [memcached.exe] |
Now let’s set up memcached for Python. First we get memcached out of here. Then we enter the following command in the directory where we extracted the file.
1 | python setup.py install |
That’s it. Now settings.py we can make descriptions in his file. It’s not much different from what we’ve done before, actually.
1 2 3 4 5 6 | CACHES = { 'default':{ 'BACKEND' : 'django.core.cache.backends.memcached.MemcachedCache', 'LOCATION' : '127.0.0.1:11211', } } |
Here, the IP address we specify as location specifies the machine where caching will be performed. That’s what we said because it’s a local machine. You can define more than one machine.
1 2 3 4 5 6 7 8 9 | CACHES = { 'default': { 'BACKEND': 'django.core.cache.backends.memcached.MemcachedCache', 'LOCATION': [ '172.19.26.240:11211', '172.19.26.242:11211', ] } } |
Now, let’s do the caching. We can caching in two ways. All site or desired views.

The Entire Site
The following codes to make caching the entire site settings.py we add the following codes to the MIDDLEWARE_CLASSES variable in the file.
1 2 3 4 5 | #… 'django.middleware.cache.UpdateCacheMiddleware', 'django.middleware.common.CommonMiddleware', 'django.middleware.cache.FetchFromCacheMiddleware', #… |
The caching process will start when you restart your project. The pages will now be removed from memory.
Views
If you want to apply caching only to certain views, you can type the following lines per view.
1 2 3 4 | from django.views.decorators.cache import cache_page @cache_page(60) def gorunum_islevi(request): .... |
It says that the caching will be done for 60 seconds. When caching is done, you can specify the cache name as a parameter if you are going to make the views. If not specified, the default cache is used.
1 2 3 | @cache_page(60,cache="cache_ismi") def gorunum_islevi(request): .... |
The files we mentioned at the beginning of the article are encrypted by a key when saving. Here we can also give this key as a parameter.
1 2 3 | @cache_page(60,key_prefix="anahtar") def gorunum_islevi(request): .... |
Caching views over URL
If we want to caching views directly through the URL can do.
1 2 3 4 5 | from django.views.decorators.cache import cache_page urlpatterns = ('', (r'^gorunum-url/$', cache_page(60)(gorunum_islevi)), ) |
Within The Template Caching
Sometimes we would like to enter more detail and just caching on a specific part of the template. The structure of use for this is as follows.
1 2 3 4 5 6 | {% load cache %} {% cache 2 ogranci_adi_onbellek %} {{ogrenci.adi}} {% endcache %} |
Here is the first cache included. After
1 2 3 | {% cache ..%} ... {% endcache %} |
the statements to be cached are written between the statements. the cache statement takes at least two paremeters. The first is the cachhing period and the second is the name. For example, in our previous student list view, we draw the student name from cachede. If you try it, you can see that all student names are the same. Because when the first student withdraws, the student’s name is cached and every time he withdraws from here.
